VMware Aria Operations for Applications (formerly known as Tanzu Observability by Wavefront) supports a number of third-party authentication solutions that use SAML. The SAML (Security Assertion Markup Language) standard enables an identity provider (IdP) to pass authorization credentials to service providers (SP). In environments that use SAML, users log in once and authenticate to many different services.
- Self-Service SAML SSO is not available for customers who have set up multi-tenant authentication.
- Self-Service SAML SSO is not available for trial customers.
Single-Tenant Authentication
Most administrators set up authentication in their environment by setting up SSO using an identity provider (IdP). Authentication integrations with the following IdPs are predefined.
- OneLogin
- Okta
-
Note: PingFederate Self Service SSO is not supported.
- VMware Workspace ONE Access
SSO setup with other IdPs is also possible. If your environment requires the setup of SSO using and IdP that is not available in the predefined list for self-service SAML SSO (for example, Azure AD or ADFS), create a support ticket.
As an administrator, in single-tenant authentication environments, you can set up SAML SSO and your users will log in to the identity provider. After a user has been successfully authenticated, you can set the permissions for that user. Permissions determine what the user can do in the environment.
Set Up SAML SSO
- Log in to your service instance (
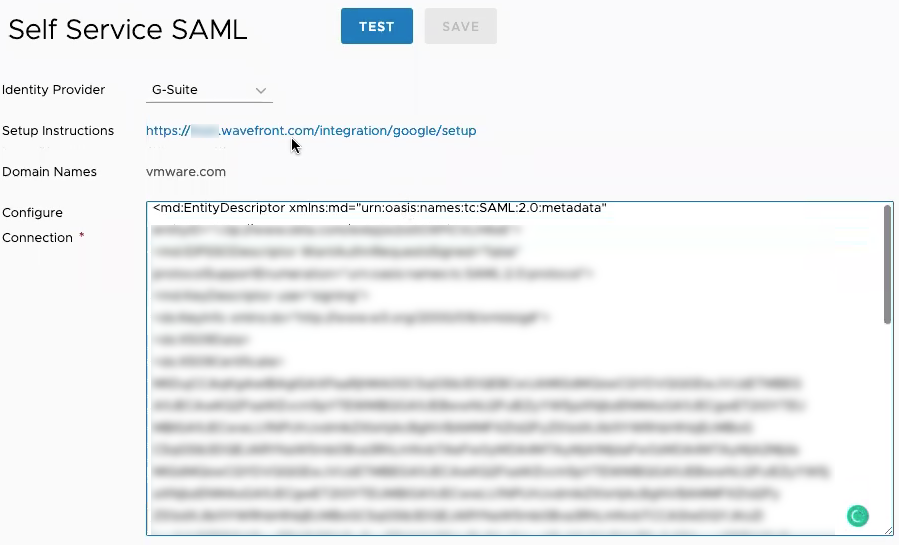
https://<your_instance>.wavefront.com) as a user with the SAML IdP Admin permission. - Click the gear icon on the toolbar and select Self Service SAML.
- From the Identity Provider drop-down menu, select the identity provider that is used in your environment.
-
Click the Setup Instructions link.
The link directs you to the instructions for setting up the provider integration that you selected.
- Follow the instructions to retrieve the metadata for your identity provider.
- In the Configure Connection field, paste the metadata and click Test to validate the metadata.
-
Log in to your identity provider.
After the login is successful and if the test was successful, the Save button becomes available.
- Click the Save button to save your changes.
Update SAML SSO
If the certificate that’s used in your setup must be replaced, you can delete the existing setup and set up SAML SSO again.
- Log in to your service instance (
https://<your_instance>.wavefront.com) as a user with the SAML IdP Admin permission. - From the gear icon on the toolbar, select Self Service SAML.
- Click the Click Here link to delete the existing key pair.
- Repeat the setup process.
How to Add New Users After Single Sign-On Has Been Enabled
Problem
After SSO has been enabled, all authentication is now handled by the Single Sign-On identity provider.
- Even Super Admin users can no longer invite users from the Account Management page. The Invite New Users button is not clickable.
-
Attempting to invite a user from the API results in the following error:
{ "status": { "result": "ERROR", "message": "Cannot process the request when SSO is enabled.", "code": 400 } }
Solution
If any user goes to the service instance in a web browser, for example, https://example.wavefront.com, and provides their email address, the user is redirected to the SSO login page and can log in with their SSO credentials.
After the user is authenticated, Permissions determine what the user can do. All new users become members of the Everyone group and inherit all permissions assigned to that group. See Authorization Model and other doc pages in that section for details.