You can create custom alert targets to configure alert notifications for a variety of messaging platforms (email, pager services) and communication channels. You can route notifications for the same alert to different targets based on a point tag.
Learn About Alert Targets
This page explains how to create and manage a custom alert target.
- You can further customize the contents of the alert notifications using Mustache syntax.
- Our blog post Engineering Tips Series: How Wavefront’s DevOps Team Uses Alert Targets to Provide Exceptional Quality of Services to Customers explains how alert targets help us to keep things running smoothly.
- For the following integrations, you can follow the steps in the integration. Log in to your service instance or look at the following pages:
Why Alert Targets?
Alert targets specify when and how to send notifications. During alert creation, you can specify an email address or a PagerDuty key in the target list. You implicitly use built-in alert targets. These simple alert targets:
- Cause notifications to be sent whenever the alert is firing, updated, resolved, snoozed, or in a maintenance window.
- Provide internal templates for the notification contents. These internal templates are maintained by us, and may change from release to release. For more flexibility, you can create custom alert targets that specify.
- Where to send notifications
- What kind of information
- Notification format
- Which alert events should trigger notifications. For example, you could use a custom alert target to:
- Expand (or limit) the set of triggering events for notifications.
- Configure different contents for notifications triggered by different events.
- Associate a short name with a long list of email addresses or a lengthy PagerDuty key.
View Custom Alert Targets
To view alert targets:
- Select Alerting > Alert Targets from the toolbar.
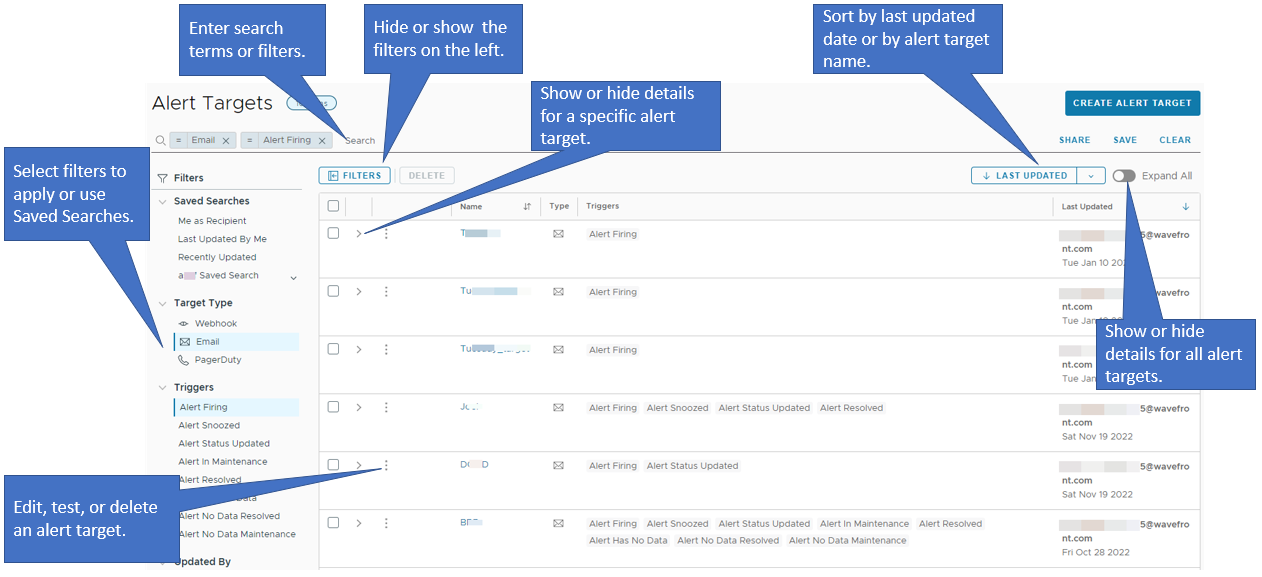
On the Alert Targets browser page, you can:
- Search for and apply filters to the alert targets so that you can narrow down the results.
- Share, save, and clear search results.
- Browse through a list of saved searches.
- Hide or show the filters and the saved searches list displayed on the left by clicking the Filters button.
- Sort the alert targets by last updated date or by target name in descending or ascending order.
- Show the details for all alert targets by turning on the Expand All toggle. By default, this setting is turned off.
- Show the details for a specific alert target by clicking the arrow next to the check box of the target.
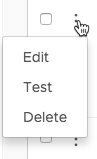
- Edit, test, or delete a single alert target by clicking the ellipsis icon and selecting the respective option from the menu.
- Select the check boxes of multiple alert targets and delete them by clicking the Delete button.
Create a Custom Alert Target
The process for creating an alert target is similar for the different types of targets. Setting the Type changes which fields are displayed.
To create an alert target:
- Select Alerting > Alert Targets from the toolbar.
- Click the Create Alert Target button.
- Fill in the properties that are common to all alert targets.
Property Description Name Name of the alert target. Pick a name that is simple and that makes it easy to identify the alert target's purpose. Description Description of the alert target. Triggers One or more alert state changes that trigger the alert target. The options are: - Alert Firing - Trigger when the alert transitions from checking to firing.
- Alert Snoozed - Trigger when the alert is snoozed.
- Alert Status Updated - Trigger when at least one time series changes category while the alert continues firing. For example, an individual time series could start to fail (satisfy the alert condition during the Trigger Window time window) or could recover (stop satisfying the alert condition during the Resolve Window time window).
- Alert in Maintenance - Trigger when a firing alert is affected by a maintenance window.
- Alert Resolved - Trigger when the alert resolves.
- Alert Has No Data - Trigger when the time series associated with the alert have all stopped reporting data.
- Alert No Data Resolved - Trigger when at least one time series associated with the alert has started reporting data, while all other time series are still reporting no data.
- Alert No Data Maintenance - Trigger when none of the alert's time series are reporting data, and the alert is affected by a maintenance window.
- From the Type drop-down menu, select the alert target type:
Property Description Webhook Alert target for sending notifications to messaging platforms such as Slack or VictorOps. This alert target defines the HTTP callback (POST request and URL) that is triggered when an alert changes state. Email Alert target for sending notifications to email systems. This alert target specifies the attributes of the email messages to be sent when an alert changes state. PagerDuty Alert target for sending notifications to PagerDuty. This alert target specifies the PagerDuty key and a POST body to use when an alert changes state. - Fill in the type-specific properties.
- For type Webhook, set these properties:
Webhook Property Description URL REST endpoint of the messaging platform to receive the alert notification. You can follow the setup steps in Slack Integration or VictorOps Integration to obtain a notification URL. The notification URL must be publicly accessible. Content Type Content type of the POST body: - application/json
- text/html
- text/plain
- application/x-www-form-urlencoded
Custom Headers Name and value of one or more HTTP headers to pass in the POST request. Body Template Template describing the contents of the alert notification. Click Template and select the template that corresponds your messaging platform: Slack or VictorOps. Or, select Generic Webhook to see all of the available content options combined in a single template. - For type Email, set these properties:
Email Property Description HTML Format Specifies whether the email platform should interpret the message body as HTML or plain text. When checked (the default), messages are interpreted as HTML. It is your responsibility to coordinate this setting with the chosen Body Template option. Email Address List One or more valid email addresses, separated by commas. Email Subject Subject of all emails from this alert target. Body Template Template describing the contents of the alert notification. Click Template and select the template that corresponds to your email formatting preference: HTML Email or Plain Text. It is your responsibility to coordinate this option with the HTML Format setting. - For type PagerDuty, set these properties:
PagerDuty Property Description PagerDuty Key API integration key for the PagerDuty application. Follow the setup steps in PagerDuty Integration to obtain the key. Body Template Template describing the contents of the alert notification’s subject line. Click Template and select the PagerDuty Subject template.
- For type Webhook, set these properties:
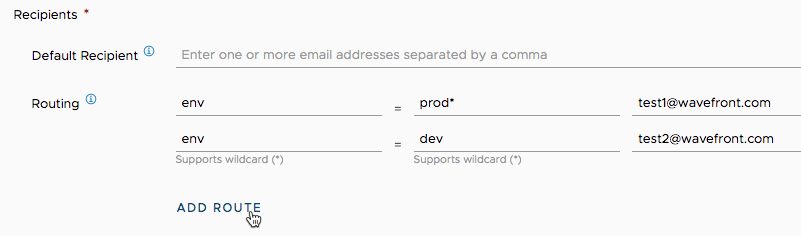
- If you want to send notifications to different targets for different point tags, you can specify them under Recipients.
- The Default Recipients field specifies recipients that get all alerts.
-
The Routing field allows you to specify the following key/value pairs:
key value source <source name> metric <metric name> <point tag name> <point tag value>
Note: You must specify either default recipients or recipients determined by routing.The screenshot below shows this for alert targets of type email.
- Optionally, customize the Body Template using the variables and functions described in Customizing Alert Notifications.
- Click Save to add the alert target and make it visible on the Alert Targets page.
- Test your new alert target, and then add it to an alert.
Test a Custom Alert Target
Test your alert target to make sure that it works properly.
To test an alert target:
|
 |
Add a Custom Alert Target to an Alert
To add a custom alert target to a new or existing alert:
- Go to the Create Alert or Edit Alert page page.
- Scroll down to the Recipients section.
-
Start typing in the Recipients field. A drop-down list appears.
This list contains all available alert targets that can be integrated to your alert.
- Select the alert target that you want to add, and click Save.
Edit a Custom Alert Target
You can edit a custom alert target at any time.
To edit an alert target:
-
Click the alert target name in the Alert Targets browser.
You can also click the ellipsis icon on the left of the alert target and select Edit.
Delete Custom Alert Targets
You can delete one or more custom alert targets.
To delete many alert targets:
-
Select the check boxes next to the alert targets that you want to delete and click the Delete button on the top of the Alert Targets page.
The button is grayed out if you don’t have permission to delete any of the selected alert targets.
To delete a single alert target:
- Click the ellipsis icon to the left of the alert target and select Delete.
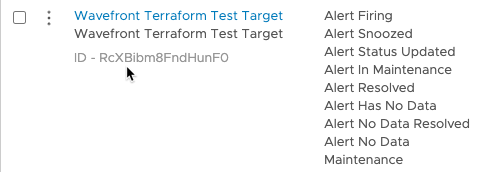
Find an Alert Target ID
Each custom alert target has a unique ID that the system generates when you first create the alert target. To find the ID:
To create a dashboard:
|
 |
Add Custom Alert Routes
By default, an alert notification is sent to all recipients that are specified in the alert target. It’s possible to customize an alert target, for example:
- If source=host1, send an email to userA and userB.
- If source=host2, send an email to userX
You can customize for each target type, and can route the notification based on metric, source, or a point tag key. See Step 6 in Create an Alert Target above.
Content of Routed Notifications
Routed notifications differ from non-routed notifications:
-
If you don’t use routing, all recipients receive a notification that starts when the triggering condition was met.
-
If you use alert routing, each recipient receives a notification when the triggering condition for that route was met, but the notification points to the whole alert.
Consider this example:
- An alert monitors CPU in a dev environment and a prod environment.
- You specify two alert targets:
- Target 1 sends a notification to mngr@example.com when the alert is triggered, that is, when CPU on either dev or prod goes above the threshold.
- Target 2 sends a notification to usr@example.com when
env=dev, that is, when CPU goes above the threshold on any hosts in the dev environment.
- When the prod environment goes above the threshold, mngr@example.com receives a notification.
- When the dev environment goes above the threshold, usr@example.com receives a notification, and the notification window starts when the alert fired, that is, when the CPU went above the threshold for prod.
It’s easy to find the information for dev in the chart associated with the notification because there’s a second event that shows when the alert was updated.
Query Responses of Webhook Alert Targets
Response codes from webhooks alert target calls are exposed as metrics:
~alert.webhooks.<webhook_id>.1xx
~alert.webhooks.<webhook_id>.2xx
~alert.webhooks.<webhook_id>.3xx
~alert.webhooks.<webhook_id>.4xx
~alert.webhooks.<webhook_id>.5xx
The response codes indicate if a webhook call was successful and if the webhook generated a notification. You can query these metrics to determine if any webhooks are generating a problem response code. The metrics have the point tag name = <webhook_name> so you can determine all the response codes for a particular webhook alert target:
cs(~alert.webhooks.*.*, name=<webhook_name>)
If the response code of the webhook is anything other than 2xx, we create an event with the name <webhook_id>.<webhook_name>.<response_code>.
cs(~alert.webhooks.*) in alerts.